

How To Change Air Conditoner Compressor On A 2006 Madza5
Need to supercede your cars air conditioner compressor? Nosotros are a team of ASE certified mechanics that have created this guide so yous can save money and go the satisfaction of doing the job yourself or see what y'all are paying for when taking your automobile is for repairs. Let'southward leap right in! Responsible for receiving spent (depression pressure) r134a refrigerant and compressing it into the loftier pressure gas these units are prone to failure which usually happens in 1 of ii ways. Either they can leak refrigerant from the torso or the front seal or they will suffer a mechanical failure and create a rattling noise when switched on or only lock up altogether. Either manner the compressor must be replaced. Though this job might exist intimidating for some, it'due south not too bad in one case you get comfy past seeing it done first. Its like Bob and Ken (2CarPros) e'er say;" it's just nut and bolts". This task is typically washed in under 4 hours and tin can save yous up to a thousand dollars and take the satisfaction that you did it yourself. You will demand replacement parts and an air conditioner gauge set up and vacuum pump which yous can get from Amazon for a little over a hundred bucks. Then you will have them for the next time any air conditioner work needs to exist done for family or friends. Before work begins park the vehicle on a flat surface with the emergency brake on, engine off while wearing protective heart vesture and gloves. SPONSORED LINKS When doing whatever a/c repair is a expert idea to know how the air conditioner system works and then you lot may have a improve understating of the system operation. Before opening the system upward nosotros must bank check to encounter if whatever refrigerant is left within before disassembly. Learn more than: Checking refrigerant levels Almost of the fourth dimension when a compressor needs replacement its because of a leak then the system will be flat in which example you can continue with this guide. Disconnect the negative side of the bombardment to avoid electrical short when working effectually the engine. (Note: If the radio is being used, tape it's presets as they will demand to be re-entered after the battery is reconnected.) Unbolt and remove whatsoever tubing or hoses to gain access to the serpentine chugalug for removal. This tubing is used for emissions and air filter intake proposes and is ordinarily easily removed by undoing minor bolts or screws. Next, the serpentine chugalug must be removed which drives the compressor except for hybrid and electrical cars. SPONSORED LINKS While some compressors are in plain sight others can be buried beneath a layer of brackets and accessories such as an alternator or ability steering pump. To proceeds access to the compressor remove boosted accessories such as an alternator. This can be washed by loosening and removing wiring connectors and mounting bolts. One time these obstructing accessories have been removed locate the electric connector on the front or rear of the compressor. This wiring is uses to energize the engagement coil if it'southward located in the front or the internal control valve if located in the rear. Utilize a small pick or screwdriver to release the electric connector condom. If this connector cannot be seen or its as well difficult to remove you tin practise so once the mounting bolts take been removed to the compressor. SPONSORED LINKS Locate and remove the high and low side refrigerant line mounting bolts or flare nuts depending on the manufacturer pattern. Over again on some models this pace may need to exist performed afterward the mounting bolts have been removed and the unit is loose. Afterward the bolts have been removed firmly grasp and jerk the line bulkhead of each refrigerant line to slowly pull upward and disconnect. There is an O band seal which can brand a tight fit and a small corporeality of refrigerant (force per unit area) perchance released as well. Consummate this step by removing both high and low side fittings. In one case all wiring harness connectors and refrigerant lines accept been removed locate and remove lower and upper mounting bolts. These bolts can consist of long and short bolts which quondam tin exist obscure and difficult to get to and if then use a universal joint socket or small wrench to help in the removal. E'er leave at to the lowest degree one loose bolt continued to the bracket or block to hold the unit in place. SPONSORED LINKS Grasp the unit of measurement while removing the final mounting commodities the compressor is a little heavy and a bit awkward to concord and then be careful information technology doesn't fall and crusade damage to the unit or yourself. Once completely loose remove it from the engine bay. This can take some work and sometimes you must move the engine a tiny scrap in its mounts or possibly fifty-fifty loosen the engine mounts and employ a jack under the oil pan to assist elevator it slightly. Other times a radiator or cooling fan shroud must be removed as well. Once the unit of measurement has been removed plow the pulley or clutch to determine its condition past checking for rough motility or grinding noises. If present this sometimes can mean the system is contaminated with foreign metal debris from the failed unit which can plug the orifice tube or expansion valve. In these cases the organization must be flushed by using an a/c system flush kit which can exist purchase from Amazon or the local parts shop. If the system is completely plugged its best to supersede the expansion valve or orifice tube along with the receiver dryer or accumulator depending on the system pattern. Audit for obvious contamination by looking inside the refrigerant lines or intake and exhaust ports for metal particles. Please watch this video of the job existence done, then continue down the guide to glean additional helpful information. Compare the new compressor to the old unit to ensure a proper installation. Sometimes the replacement unit can await slightly dissimilar due to updates and slight design variations. The 1 affair to look for is the configuration of the refrigerant ports on both the intake and exhaust sides. Besides, check the belt pulley by counting the number of ribs which the belt must ride on likewise the outside bore must exist correct. SPONSORED LINKS When installing the new compressor into the engine bay it's a expert thought to transfer some of the mounting bolts from the old unit or before lower it into the engine bay this will help for easier installation. Though the organisation has peg oil throughout its internal workings and is usually including in the new compressor it's a good idea to add a slight amount (1/ii ounce) of compressor oil to ensure proper lubrication before installation, then reinstall dust caps. Some units take oil already installed exist sure to read the installation instructions for more than data which is supplied with the replacement unit. O rings are used to seal the high and low side lines to the compressor housing. These sealing surfaces must be make clean and costless from dirt or damage to keep them from leaking. Use a modest screwdriver or pick to carefully remove the one-time O band seals from both the high and low side lines without scoring the sealing surface where the O ring sits, this will ensure a proper seal. SPONSORED LINKS Match the former O rings to the new ones to ensure a proper seal. Proceed an eye on the thickness because some O rings can be smaller in diameter then others. Information technology'south a expert idea non to reuse the sometime seals because they become flattened over time due to pressure and heat and may leak which would cause the task to be redone which means vacuuming downwards and recharging the system. Afterwards cleaning the plumbing equipment thoroughly install a new O ring seal on each the low and loftier side fittings. Once installed apply a sparse layer of peg oil over the O band to help the installation without dissentious or cutting the new seal, repeat this process for each line. Clear any hoses or lines while gently lowering the new unit of measurement into the engine bay. Hand thread in the mounting bolts which volition hold the unit into its mounts or engine cake. Once all mounting bolts have been hand threaded in use a wrench or socket to tighten the mounting bolts evenly in a cantankerous pattern. This volition help to not distort the housing which tin cause premature failure. SPONSORED LINKS Remove the port dust covers and install both high and low side refrigerant lines with the mounting bolts and and so tighten. These bolts don't need to exist extremely tight just snug enough to not come loose and seal against the housing. Once all the mounting bolts are tight brand sure the electrical connector is clean before reconnecting it to the engagement coil or refrigerant control valve. Reinstall any accessories such as the alternator by gently lowering them into the engine bay while installing the mounting bolts and electrical connectors. While holding dorsum the serpentine chugalug tensioner, reinstall the chugalug into place. Once completed double check the alignment of the belt by inspecting the pulleys of each accompaniment and drive pulley located on the engine crankshaft. SPONSORED LINKS Reinstall any tubes or hoses removed in the replacement procedure continue past tightening all bolts, screws, clips or brackets previously removed. Now the system is ready to have a vacuum down and recharge service performed. Never simply fill the system with refrigerant considering moisture is present within the arrangement due to the normal atmosphere that entered once the system was opened. This tin can cause the compressor to fail prematurely and the system will not work also. If the vehicle is used in colder weather and the organization is non used much it's a good thought to plow the system on occasionally to help motility the oil around the system which will help lubricate the seals and help the compressor concluding longer. Our certified technicians are gear up to respond machine repair questions for complimentary. We hope you saved money and learned from this guide. We are creating a total fix of car repair guides. Please subscribe to our 2CarPros YouTube aqueduct and check dorsum often for new videos which are uploaded regularly. SPONSORED LINKS Article published 2022-03-13 What Goes Wrong?
Getting Started
Before Beginning
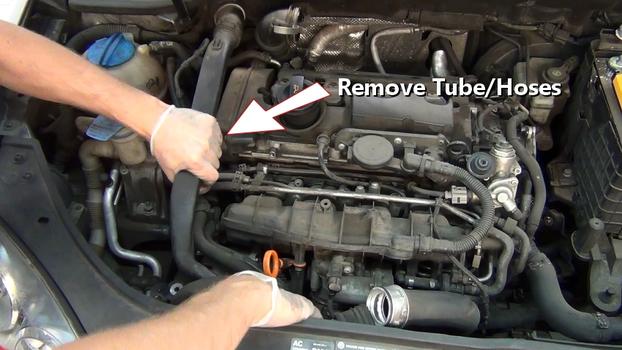
Step 1: Remove Air Intake and Accessories
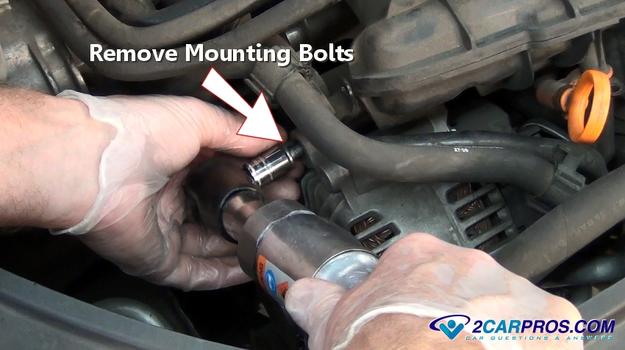
Stride 2: Removing the Compressor


Pace 3: Checking the Old Compressor for Damage

Scout the Video!
Step 4: Preparing the New Compressor


Pace v: Replacing the O Band Seals


Step 6: Installing the New Compressor


Footstep 7: Finish Reassembly

Yous might as well be interested in:
Helpful Tip
Questions?

Source: https://www.2carpros.com/articles/replace-air-conditioner-compressor
Posted by: gasparhossing.blogspot.com
0 Response to "How To Change Air Conditoner Compressor On A 2006 Madza5"
Post a Comment